A sequencer is an advanced stimulus generator that controls the items provided to the driver and then driver executes those items during the simulation.
Generator randomizes arrays of transactions and sequencer controls the generation of random stimulus by executing sequences. The sequence has the meaningful stream of transactions which can contain random data items, parameters and user can also add constraints. A user can combine sequences to create complex traffic streams.
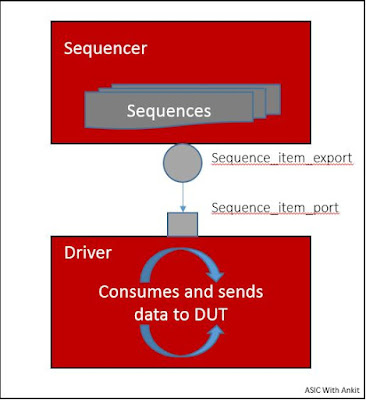
Now, let’s understand UVM Sequencer with some more details from very simple picture given below:
Typically sequencer waits for get_next_item() call from a driver, randomize the item data and then sends the data item to the driver for execution.
How to create a sequencer?
- Derive sequencer from the uvm_sequencer base class and specify request and response type prameters.
- Use `uvm_component_utils and constructor
With these, you can define the baseline for sequencer, with built in sequencers behavior you can generate a constrained random data with synchronizing driver and sequencers.
Driver and sequencer are connected by way of TLM with driver’s seq_item_port connected to the sequencer’s seq_item_export. Sequencer produces data and sends them through se_item_export and driver consumes data itesm through its seq_item_port as shown in the figure above. A response is optional. Connections are made by components that contain instances of the driver and sequencers.
Handshake between Driver and Sequencer:
Basic handshake is done using the task get_next_tem() and item_done(). Driver requests a randomized item from sequencer and block waiting for the sequencer to have an item available. When sequencer has an item available, it will provide it and the get_next_item() task will return this item. Driver signals the sequencer that the item was processed using item_done() after sending it to DUT.
Simple Example:
class my_sequencer externs uvm_sequencer #(my_pkt_transfer);
`uvm_component_utils (my_sequencer)
function new (string name, uvm_component parent);
super.new (name, parent);
endfunction : new
end class : my_sequencer
Let's understand sequencer from example sudo code:
`uvm_component_utils macro is used to register sequencer with the common factory. In the class definition above, by default, the response type is the same as the request type. If you expect the different response, an optional second parameter must be specified for the uvm_sequencer.
something like...
class my_sequencer externs uvm_sequencer #(my_pkt_transfer, my_pkg_response);
These are basic things to understand sequencer and definition of the sequencer to use it with the driver. We will continue on this for driver part and communication with Driver.
Hope, this is useful and clears some basic facts about sequencer and its usage. Feel free to shoot me an email asicwithankit@gmail.com for any question on this or would like to understand more on this.
Happy Reading,

5 comments:
Nicely explained, who don't have much knowledge on UVM, can understand easily..
Thank you, Balaji for reading :)
Let me know for any questions on SV, UVM.
Thanks,
Ankit
hi Ankit,
I appreciate this verification blog,which is more useful for every ASIC engineer in learning UVM.
Thanks,
srikanta
hi Ankit,
I appreciate this verification blog,which is more useful for every ASIC engineer in learning UVM.
Thanks,
srikanta
Thank you, Srikanta. Glad you like it and find it useful. Stay tune for more...
Keep reading and keep sharing !
Thanks,
Ankit
Post a Comment